Wednesday, 16 March 2022

Testing Schwalbe's Super Race Thunder Burts

Schwalbe Thunder Burt Super Race versus Continental Race King Protection rolling resistance
A few months ago, Bicycle Rolling Resistance (BRR) tested the latest version of Schwalbe's Thunder Burt with the 2.25" Super Ground casing (see results here).  It performed really well, narrowly beating the previous best mountain bike tyre, the 2.2" Continental Race King Protection (see results here).

As BRR said in it's conclusion: "The current generation has moved to Schwalbe's Super casings with a Super Ground and Super Race version available in several sizes. As the name suggests, the Super Race should be a bit faster than the Super Ground, while the Super Ground offers a bit more protection"

"...It looks like the Super Race version of the Thunder Burt is racking up quite a few votes and has a good chance of being tested in the near future as well."

Sadly though, the Super Race version of the Thunder Burt never made it to the top of the voting list and it expired from the list last month.  I was a little disappointed by this, but I decided to buy a pair of those tyres anyway, particularly as I have an upcoming beach race in April that the Thunder Burt tread is perfect for.  However, I wanted to test them first, to check how they performed against the Continental Race King Protection that I already own and have installed on the back of my MTB.


Equipment and test setup

I used my roller method for this testing, which I've described recently in previous blog posts.

The testing wasn't particularly straight-forward though, because my mountain bike doesn't have a power meter.  I only have power meters on my road bike, my cyclocross/gravel bike and my time trial bike.  Those are all Shimano Stages left hand crank-based power meters.  My mountain bike has a SRAM GXP mountain bike chainset, so the chainset isn't at all compatible with those power meters.
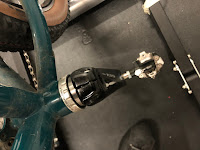

Shimano 105 Stages power meter on a Shimano SLX mountain bike (MTB) crankset
My solution was to use my commuting bike instead, which has a Shimano crankset and bottom bracket, albeit a MTB chainset instead of a road chainset.  Road and MTB chainsets are not compatible though, having different axle lengths and Q-factors.

This meant the chainset axle was too long for the Stages 105 left-hand crank arm that I tried to fit on it.  It did fit on the hollowtech tech splined axle, both having the same diameter and splines, but it left a gap between the crank arm and the bottom bracket cups.  I needed a 5-6mm spacer or washer to fill the gap.  I found that a spare set of axle cartridge bearings filled the gap perfectly (see photo above).  This was a bodge, but it worked really well.  As a result, I got my Shimano 105 power meter successfully working on the left hand side of my Shimano SLX chainset.

A bit more faffing was required to do the testing though: I had to remove my SKS mudguards, which rubbed on the large knobbly mountain bike tyres, and I changed the pedals to my good clipless SPDs too.  All in all, it took a fair amount of time before I could get started.

I chose to do the testing with a lightweight (150g) butyl inner tube, just to save the time and mess associated with a tubeless set up.  Since I was interested in which tyre was fastest, this approach was fine, because both tyres would be subject to the same additional losses from having the inner tube installed.  Furthermore, doing the testing with an inner tube allowed a better comparison with the BRR data, which also used a butyl inner tube for their testing, albeit a heavier-weight inner tube.


Results

The plot below show how the the two tyres compare.  I had enough time to repeat the testing for the Thunder Burts, after testing the Continental Race King, to confirm that Thunder Burts really does give lower CRR numbers.  Since the two blocks of testing with the Thunder Burts were before and after the testing with the Race King, then I can be fairly confident the Thunder Burts are a better tyre, despite the imperfect repeatability seen in the plot below. 


The differences aren't massive, and correspond to only 2-3 Watts at 25 kph, but it's a benefit worth having.  Something to be noted is that the Thunder Burts were slightly larger than the Race King, at 2.35" width versus 2.2".  In addition, the Thunder Burt was brand new, whereas the Race King was one or two years old and has some Stans sealant residue on the inside.  This latter point might be a source of additional losses, I'm not sure, but in any case, the purpose of this exercise was to compare these two tyres ahead of my upcoming race, so these old and used tyres are the ones I would have chosen from anyway.
Finally, it's worth noting that the agreement with Bicycle Rolling Resistance data is remarkably good at the interface of the two sets of data.  However, this might be a fluke.


Monday, 14 March 2022

Do foam tyre inserts get smaller when tyres are inflated?

Compression of MTB / gravel / cyclocross foam tyre inserts when inflated
The previous foam tyre insert testing I did (see previous blog post here) gave some interesting and surprising results.  
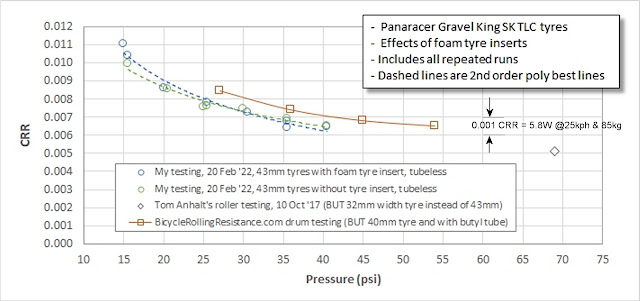
I was expecting the foam tyre inserts to cause a small rolling resistance penalty, especially at very low tyre pressures of around 15 psi. However, they didn't.  The effect of the foam tyre inserts on CRR (coefficient of rolling resistance) was within the precision of what could be measured in the test, so the effect was very small or nothing.  The results are re-shown in the plot below (the green symbols versus the blue symbols). 

This surprising result got me thinking about the causes.  Why don't the foam tyre inserts have an effect on rolling resistance?  At low tyre pressures, the compression of the foam insert at the contact patch should generate hysteretic losses that manifest themselves as additional rolling resistance. Why is that not seen?  It got me thinking.

One possible explanation, and one that I mentioned at the end of my previous post, was that the ends of the inserts were (unintentionally) not connected when I did the testing, so the foam insert was 'free floating' in the tyre cavity, rather than held tight against the rim.  This is a plausible explanation for an absence of any effect at higher pressures.  However, I would still expect the foam insert to get compressed at 15 psi, when the tyre drop (the squish) should have been enough to compress the foam insert.

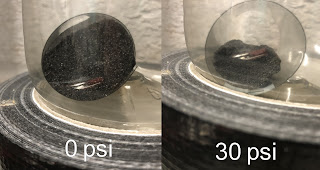
There is a second possible explanation for this observation, though, for the lack of a measurable effect of the tyre inserts.  I remembered that when Vittoria launched their Air Liner Road tyre insert for road bikes, they explained that their inserts compress into the rim bead when the tyre is inflated, because the foam is closed-cell foam.  The effect of the tyre pressure on the Vittoria Air Liner was demonstrated nicely in their video below:


This is the reason why the effect of the Vittoria Air Liner on tyre rolling resistance measurements was negligible when it was tested by Bicycle Rolling Resistance here.  It might be the same reason why Aerocoach reached the same conclusion, but for the Tubolight Road insert in their rolling resistance testing here.

Could the same thing be happening for my gravel/cyclocross tyre inserts, that they are shrinking when the tyres are inflated?  I didn't even know whether the foam inserts were constructed from closed-cell foam or not.

I decided to do an experiment to find out.  The method and results are shown in the YouTube video below:


Results


So, the answer is a YES, they do shrink, and quite a lot!

It confirms that my budget Planet X foam inserts are indeed made from closed-cell foam, and so they were subject to the same compression mechanism as the Vittoria Air Liner Road tyre insert.  The picture to the left shows the cross section of the tyre insert as the pressure is raised from zero to 34 psi.  At 34 psi, the insert has shrunk to about a third of it's original size.  At 15 psi, it would have been approximately half it's original size.

So finally, this is plausible explanation, and the most likely reason why I saw no effect on rolling resistance when I tested at 15 psi:  The tyre insert had already shrunk enough that it wasn't actually getting compressed at the tyre contact patch on the rollers. 


Do tyre insert companies know this happens?

We know that Vittoria have figured this out, but what about other tyre insert companies?  I'm not convinced they have.

If I look at some of the promotional pictures on the websites of the various companies selling foam tyre inserts, I get the impression they don't realise this compression is happening.  For example, I have shown on the left a few pictures taken from some of the company's websites. These all show the foam tyre inserts inside the tyres rolling over objects, but the inserts are the same size and shape as their pre-inflated size.

Either the tyre insert companies don't realise what's going on, or they are trying to mislead people.

It could be argued however, that this doesn't matter, and that it's the performance of the tyre inserts that matters.  I would agree with that, and the testing done by PinkBike shows that these tyre inserts do still work (for rim protection), regardless of them probably shrinking when the tyre is inflated.  
However, I think it's still important to understand what size and shape the insert becomes when it's inside the inflated tyre.  For example, is it still going to be wide enough to cushion and protect the rim flanks, or will the insert become too small for that, and instead get pushed down into the rim well and central channel?  That will affect how impact loads are taken by the rim structure.

What many of these companies show is happening, and possibly what they think is happening, inside the tyre is probably not what's actually happening.  It will depend on the construction of the tyre insert though, and how much air is contained in the tyre insert material.  Nevertheless, what's important is to check what size and shape the insert becomes when it's inside an inflated tyre.  Apart from Vittoria, I haven't seen other companies address this.


The physics behind what's happening

This final section may not be interesting to many people, but as an addendum, I can explain why a closed cell foam tyre insert shrinks when the tyre is compressed.

My foam tyre insert has a volume of around 1280 cubic centimetres and weighs 34g.  That means its density is 26.6 kg per metre cubed, which shows that most of that volume is air; air inside the closed cells of the foam.  In view of the density value, I would guess that more than 95% of it is air.

Before installing the tyre insert, the pressure outside and inside the foam insert is at atmospheric pressure, which is 14.7 psi at sea level.  When the pressure outside of the foam insert increases, however, as happens when the tyre is inflated, that external pressure causes the air cells inside the foam to compress to the same pressure.  This is the same principle as when you sit your 80kg backside on a chair: The chair and floor has to push upwards with a force of 80kg.

The volume of the air cells reduces under this increase pressure, as dictated by Boyle's law. Boyle's law says that the volume of a gas (air in this case) is inversely proportional to pressure, for a fixed mass and temperature of gas.  This means that if the pressure doubles, then the volume must half.

For our particular application, a doubling of the pressure means putting 15 psi into the tyres, because remember, the pressure started at one atmosphere, which is about 15 psi.

And what happens if 15 psi is applied?  The volume of the foam tyre insert approximately halves, as shown on the left.  This is a good demonstration of Boyle's law.  Another demonstration of Boyle's law, very similar to this, can be found here, which is the link on the Wikipedia page.

People very familiar with these gas laws may already realise that for the case rapid inflation or deflation, as shown in my video, the expansion is not strictly following Boyle's Law.  This is because Boyle's law assumes an isothermal (constant temperature) expansion or compression.  A rapid expansion or compression is an adiabatic process (no heat transfer) instead of an isothermal one, and is therefore subject the Ideal Gas Law instead, which considers temperature changes on pressure and volume (whereas Boyle's Law assumes temperature is fixed).  In the case of a tyre being quickly inflated, if the pressure is doubled, the volume won't be halved but will be 61% instead. This 0.61 value come from 0.5 raised to the power of (1/gamma), where gamma is the specific heat ratio for air, which is 1.4.

What's important though is what volume the foam tyre insert will be when it's in the inflated tyre being ridden.  In that case, the foam insert and the tyre will have reached thermal equilibrium after half an hour or so, so in all practical riding cases, where tyres would have been inflated in advance of the ride, thermal equilibrium would have been reached, and so Boyle's law is appropriate.


Monday, 21 February 2022

Do foam tyre inserts degrade rolling resistance?

Do foam tyre inserts affect the rolling resistance of a tyre?  Based on this testing then the answer is no, probably not.

If there is a penalty at all, then it's very small, at least for the tyre inserts that I tested.  Read on for more details...

Why I've been using tyre inserts

About two years ago I tested the effect of tyre pressure on rolling resistance, using my Cyclocross/Gravel bike ridden on a grass field.  That test used the Virtual Elevation (VE) outdoor method.  The tyres I used were 35mm Schwalbe X-One Allround tyres.  The results were explained in my previous blog post here.

Those results from 2020, shown in the plot on the left, really surprised me because there was no 'optimum' tyre pressure.  The red points continue the downward CRR (rolling resistance coefficient) trend towards the left hand side of the plot, for lower pressures.  I was expecting there to be an optimum pressure somewhere, that gave the minimum rolling resistance.  However, the testing showed that lower tyre pressures were always best, even at pressures so low that the tyre became laterally unstable.  Rolling resistance expert Tom Anhalt commented on a forum that other people had found similar similar results to this in the past, for MTB tyres, finding also that lower pressure was best for rolling resistance.

After this testing, I began to run lower pressures on my cyclocross bike, to exploit these rolling resistance advantages, and in doing so also gained some comfort and grip benefits.  The potential problem with running lower tyre pressures though, as all mountain bike and cyclocross riders will know only too well, is an increased risk of rim damage and pinch flats if you hit a sharp object.

Indeed, several weeks later, while I was out on a ride I double-flatted my tubeless Schwalbe X-One tyres after hitting a concealed rock.  One tyre was punctured so badly that it struggled to hold air, even with tubeless 'bacon' repair strips inserted into the tyre hole.  I just about made it back home.  One of the tyres was badly damaged and had to be thrown away.

My motivation for using foam tyre inserts, then, was to allow me to run lower pressures, to take advantage of the rolling resistance benefits shown in the plot above, but reducing the risk of rim damage and pinch flats.

I have been using foam tyre inserts for almost two years now on my cyclocross/gravel bike.  Although I've been generally very happy with them, I've always wondered in the back of my mind whether I'm paying a rolling resistance penalty by using the foam inserts. If it's a large penalty, it might actually cancel out the benefit of running lower pressures.  That's why I wanted to do this testing.


Available Data

As far as I'm aware, there has been very little testing of rolling resistance done and published for the commercially available tyre inserts, which is a shame, and this is the reason I've done this testing.

Testing of tyre inserts, especially for mountain bike applications, usually involves only a qualitative assessment of the effect of tyre inserts on the ride feel, tyre stability, tyre damping and rim protection.  Some quantitative testing was done by Pink Bike last year, but that testing was limited to evaluating rim impact protection only.

Testing of road tyre inserts has been done by Aerocoach and Bicycle Rolling Resistance, both concluding minimal impact on rolling resistance, but tyre liners for road tyres is not something that interests me, because for road use there isn't the same benefit or desire to run very low pressures.

To be honest, I find it a little frustrating that tyre insert companies don't provide rolling resistance data.  Often they don't even address the rolling resistance question at all.  This is perhaps understandable if downhill mountain biking is the target market, but for gravel and cyclocross applications, like this this one or this one, then I'd like to see rolling resistance data provided by the tyre insert companies.

I'm also really hoping that Bicycle Rolling Resistance will do some tyre insert testing for MTB and gravel inserts soon.  It's on their voting list, but far from the top of the list at the moment.  Tyre inserts aren't cheap, so I can't justify buying a variety of brands and testing them myself.


My tyre and foam tyre insert set-up

I previously used 35mm Schwalbe X-One tyres for my outdoor rolling resistance testing.  However, in 2020 I swapped to 
43mm Panaracer Gravel King SK TLC tyres after I damaged one of those Schwalbe tyres in the double-flat incident. Panaracer Gravel King SKs get good reviews and are a more  summer-focussed tyre, which suits my riding.  Also, they test quite well in terms of rolling resistance, based on measurements made by BicyclingRollingResistance.com.

The foam tyre inserts I bought were from Planet X, called "Barbieri Anaconda Puncture Protection System".  These are 
no longer available to buy from Planet X, but they are budget round-section 'pool noodle' type closed cell foam inserts.  They cost £19.99 including valves.

At the time of installing them, I was conscious that the rolling resistance might suffer, so I trimmed the top of the round section off, as shown in the photo to the left.  The aim was to provide more of a gap between the outside of the foam insert and the inside of the tyre, trying to prevent the tyre from touching the foam insert at the contact patch.  Through some tyre drop measurements, I worked out that the inside of the tyre would touch the insert only at pressures below 14-16 psi on a flat surface, which corresponds to a tyre drop of around 15mm.  However, it should be noted that the same 14-16 psi tyre pressure should result in a larger tyre drop when it's on the rollers though, because their small roller diameter exerts a higher localised load on the tyre at the contact patch.

The photo below shows some quick (rather crude) measurements of the tyre external depth and also the depth of the foam tyre insert.


The width of the tyre and the foam insert are shown below. The foam insert is fairly narrow, at 30.4mm, considering the rim has an internal width of 23mm and an external width of 28mm.  Nevertheless, when riding over rocks and other obstacles, I felt qualitatively that the foam inserts were being compressed whenever I hit obstacle that would have otherwise caused the tyre to bottom-out.  It didn't feel like the usual tyre-on-rim contact that you get without tyre inserts installed.  


Test method selection

My test method was the same roller testing, as I described in my previous blog post.  Why roller testing though?  Virtual elevation (VE) testing would have been suitable too, based on my previous experiences, but VE testing is significantly less convenient:
  • VE testing takes much longer to perform, several hours as opposed to about one hour for roller testing.
  • VE testing needs good conditions: Low wind days are needed, and obviously also daylight, which is more difficult in winter.
  • For VE testing outdoors, the ground needs to be fairly robust, so that multiple runs don't degrade the ground and lead to a drift in the rolling resistance being measured. This generally means that for off-road applications, the ground needs to be dry.  Again, that's difficult or impossible in winter (in the UK).
In its favour, VE testing does however provide the complete picture of all three rolling resistance losses: (1) Tyre hysteretic losses; (2) suspension/impedance losses; (3) ground deformation hysteretic losses.  Roller testing on the other hand will only provide an indication of #1, the tyre hysteretic losses.  However, for foam tyre inserts, I felt that this was the primary mechanism by which inserts might cause additional losses. Therefore, I decide that roller testing was the best method for this situation.


Test method description

I started with the foam insert installed in the tyre, performed the tests with various pressures, removed the foam insert, then repeated the tests with various pressures again without the insert in place.

The rear wheel weighing was done using my front fork mount, by lifting the bike off to the side of the rollers and onto the bathroom scales.  As before, timber blocks were use to ensure the bike was horizontal while on the scales, thus ensuring the scales weighed the same rear wheel weight as the weight that's on the rear wheel for the rollers.

For the roller testing, I performed a few repeats throughout the test, three specifically, which helped give me a feel for the repeatability of the results from this testing. The repeat runs are included in the results shown below. 


Results

The test results are shown in the plot below, with the green and blue symbols.  The dashed lines are best fit lines put through the data.  Data from Bicycle Rolling Resistance and from Tom Anhalt's testing is also shown in the plots, although it should be noted that for those tests there are differences in the inner tube being used and also the tyre width.  

Bike tyre rolling resistance coefficient (CRR) testing using rollers and effect of foam tyre liners on rolling resistance


The raw data is shown in the spreadsheet screenshot further below:


The plot above shows that the effect of the foam tyre insert is small and possibly nothing at all.  If there is an effect of the foam insert on rolling resistance, it's close to the precision and the repeatability of what can be tested I think, so less than about 2-3 Watts at 25 kph.

I was expecting a larger difference at low pressure, where the foam insert might have been getting compressed.  However, even at 15 psi, the differences are small.  The best fit lines suggest there is a larger difference at 15 psi, but the green and blue data points aren't a lot further apart at 15psi than they are than elsewhere.  Additional testing to collect more points (repeats) would be needed if I wanted to really confirm that.


Conclusion and caveats

In any case, the conclusion is that the effect of these foam tyre inserts is small at the most, and possibly nothing.

There is one final caveat to mention though: When I removed the foam insert I noticed that the tape holding the two ends of the foam insert had come apart and so the two ends of the foam insert weren't attached to each other.  I don't know when this happened, but it means that the foam insert was probably 'free floating' inside the tyre cavity, rather than being a continuous foam hoop held in contact with the rim and tyre bead.  In a way, it would have been behaving rather like a Huck Norris foam insert, but possibly with even less contact with the tyre, owing to it's small diameter.  I don't know if this has an effect, but it's important to note.  I didn't have the time or inclination to repair the foam insert (to clean and re-join the ends), re-test all the pressures, and then remove the tyre again to check it was still okay.  A free-floating foam insert might possibly cause lower rolling resistance losses, because it is not contacting the tyre side wall near the rim.  However, at this point I can only speculate. 


Saturday, 19 February 2022

Testing of tyre rolling resistance using rollers - Part 2, Setup improvements

Following on from Part 1 of the roller testing described in the previous post, I made a couple of important improvements:

Speed Sensor: In my Part 1 blog post, I explained that I didn't yet have the magnetic Garmin speed sensor that I'd ordered.  I subsequently received the speed sensor through the post and installed it in a similar way to how Tom Anhalt did, setting the 'wheel circumference' on my Garmin head unit to 261mm, which is the measured roller diameter of 83.0mm, multiplied by pi.

I'm still a bit surprised the speed sensor works with the magnet triggering the sensor so quickly, at about 40-50 Hz (every 2-3 hundredths of a second!).   

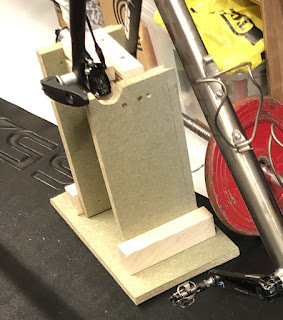
Front fork mount: Previously I had to prop myself upright using my elbow.  I built a fork mount using a spare piece of chipboard flooring and a few spare bits of timber.

The axle itself is the axle clamp borrowed off my Thule 561 bike carrier (the 561 is now discontinued). 

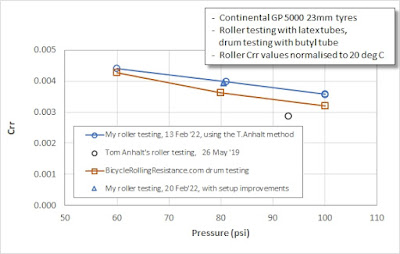
After making these two improvements, I wanted to check the effect on the rolling resistance measurements by re-doing the runs at 80 psi, using my road bike and Continental GP5000 tyre, as tested in Part 1.  The results below (shown with blue triangle symbols) show that these two set-up improvements have quite a small effect on the results.  It's quite reassuring that one week later, with some tweaks to the setup, I get very similar results to the previous weekend.


Sunday, 13 February 2022

Testing of tyre rolling resistance using rollers - Part 1


Bicycle tyre rolling resistance coefficient (CRR) testing using rollers
A previous blog post from 2020 described my measurements of tyre rolling resistance that I did using the Virtual Elevation outdoor method.

Tyre rolling resistance coefficients can also be measured using rollers instead, and I've been keen to try that method ever since reading about it a few years ago. However, I've never owed a pair of rollers, so that test method hasn't been possible up until now.

Recently though, there have been a couple of things I really wanted to test, which I'll describe in a future blog post.  That finally gave me the impetus to buy a pair of rollers.  I bought a pair JetBlack R1 rollers in the Evans Cycles sale for £100.


Overview of available rolling resistance testing methods

As a brief introduction, I want to first quickly describe the four methods for measuring bicycle tyre rolling resistance that I'm aware of:

1) Drum testing: This involves turning a tyre and wheel on a large drum and measuring the power required to turn the drum, to overcome the losses due to tyre rolling resistance.  An example of this kind of testing can be found on bicyclerollingresistance.com.

2) Roller testing: This is similar in principle to drum testing, but is more accessible to amateurs that don't have access to specialised equipment necessary for drum testing.  All that's needed is a standard set of rollers, a power meter, and a few small pieces of equipment (which will be described later).  An example of roller testing, which is also the exact method I used, can be found here.

3) Virtual Elevation testing: This is another technique accessible to amateurs, as long your bike has a power meter.  It is more time consuming than roller testing, but has other advantages.  My previous post here describes how I measured the rolling resistance coefficients for my cyclocross tyres on a grass surface, using this method.

4) Roll down testing: This is another technique accessible to amateurs and is also relatively quick to perform.  Unlike methods 2 and 3, it does not need a power meter.  This roll down method can therefore be very appealing to people, especially as it gives a direct speed/time benefit, needing no data processing.  However, many experts express reservations about the sensitivity of roll down testing to detect changes in rolling resistance.  For example, the runs are generally performed on the same hill in one direction and therefore the results are affected by small, indiscernible fluctuations in wind.  VE testing (method 3) mitigates this sensitivity to the wind, partly at least, by performing laps that go against and also with the wind.


Roller testing method description

One of the pioneers and experts in tyre rolling resistance testing is Tom Anhalt.  For simplicity, I followed Tom's roller method as closely as possible, as described in his blog here.  Since the description on Tom's webpage is already very clear, I won't repeat it here.  Instead, I'll only describe where I deviated from his method, or one or two other interesting points:
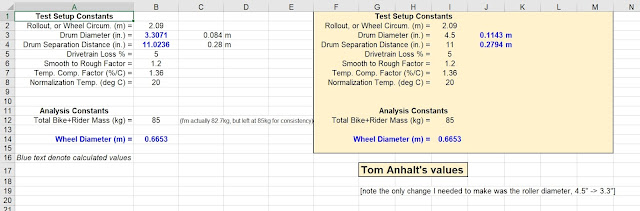
  • I used Tom's gravel tyre data recording and processing spreadsheet pretty much as-is.  I saw little value in re-working the spreadsheet, or creating my own version.  If I did so, I would only risk making mistakes.  Only one change was needed, and that was the diameter of the rollers:  Mine were 83mm in diameter whereas Tom's were larger, 114mm in diameter.
  • I didn't have an old-fashioned Garmin magnetic speed sensor when I did this initial testing.  I had already ordered one from a seller on eBay, but I was still waiting for it to be delivered.  Instead I had to use my (newer) Garmin wheel hub based speed sensor, which I think works using an accelerometer to detect rotation frequency, in combination with a prescribed wheel circumference.  This is a simplification, because keeping the wheel circumference fixed isn't quite right when the tyre pressure is changing.  For this initial 'shakedown' testing, though, I think this simplification is fine.
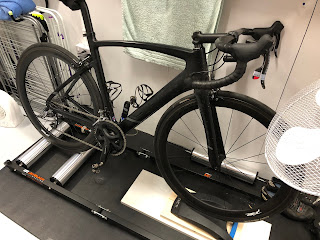
  • I didn't have a front fork mount.  I later constructed one (to be described in a future Part 2 blog post), but for this initial test I had to improvise.  Instead, I positioned the rollers next to a shelf (see photo below) and used my elbow to keep myself upright.  This really wasn't as bad as it sounds!  It's far from ideal though.
  • For this testing, and for everything else, I used a Stages left-hand crank based power meter.  Using a single-sided power meter is inferior to using a dual-sided power meter, but it's all I have unfortunately.  At some point, I will invest in a dual-sided power meter.
Measuring weight on the rear bike wheel
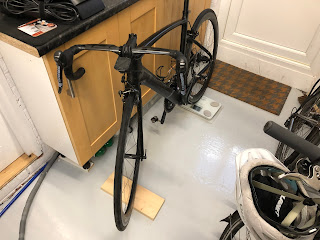
Rear wheel weighing.  I asked my wife to read off the number on the bathroom scales while I sat on the bike.

The wooden block under the front wheel was there to ensure the bike was level, which I checked using a 6ft spirit level spanning the front and rear quick release skewers.  A similar level check was done for bike on the rollers, for the actual roller testing.


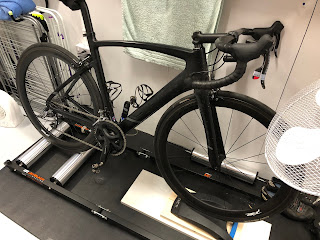
Bike tyre rolling resistance coefficient (CRR) testing using rollers
The photo on the left shows my initial roller testing setup.  The setup was improved in subsequent weeks, but this is how it was for these initial tests.


Results

In view of the simplifications explained above, I didn't want to invest too much time doing a lot of testing initially, so I spent just half an hour or so collecting and processing some data.  I followed Tom Anhalt's method exactly, so used a 5-minute warm up period, and a 4-minute 'run' period, then processing the data from the last 2 minutes of those 4 minutes to get average power and speed values.

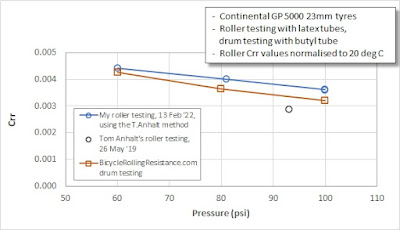
I tested my 23mm Continental GP5000 tyre at different pressures.  Results are shown below, comparing my results.  I have shown screenshots of the spreadsheet for full transparency of how I arrived at the values in the plot.

Setup and Analysis Constants

Speed, Power and CRR derivation spreadsheet


Bike tyre rolling resistance coefficient (CRR) testing using rollers

Rolling Resistance Coefficient (CRR) plot
 

The results shown in the plot above are quite encouraging I think.  Considering the small simplifications in my test (i.e. the lack of an appropriate speed sensor and lack of a front axle support), I think the results look reasonable.  The trend and values are similar to the Bicycle Rolling Resistance data (orange points), although my CRR values should actually be lower than the BRR values, instead of higher, because my testing was done with a latex inner tube whereas BRR's testing is done with standard butyl tube.

Comparisons versus Tom Anhalt's data point (the black circle in the plot) should be a reasonable like-for-like comparison, with differences coming possibly only from the roller diameter, brand of rollers, and power meter differences.  My CRR values are about 30% higher, which is quite a big difference.  I can imagine a few possible explanations, but as this was the first time I've used my rollers, I wonder if the roller bearings need 'running in', which would reduce their friction losses and would therefore reduce the apparent CRR values. This is something that should become more clear if I do further testing.

On the positive side, my repeated point at 100 psi tyre pressure for the 4th run shows excellent repeatability with the equivalent point for the 1st run.  The two data points at 100 psi are barely discernible on the plot because they are so close to each other.

For my next set of testing, I will probably use my gravel bike and try to measure the effect of foam tyre inserts on the rolling resistance coefficient.  This will be documented in a future blog post.


Sunday, 31 October 2021

Quiz: Match the tyre to it's rolling resistance numbers

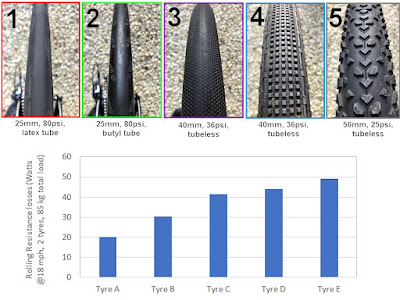
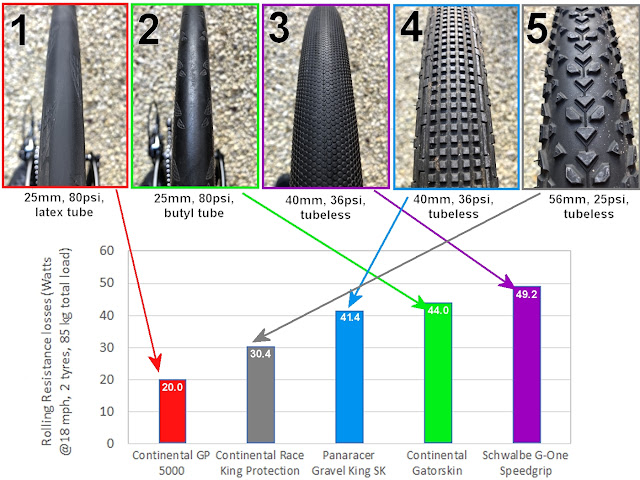
Here are five tyres and five rolling resistance power losses.  Higher rolling resistance losses mean the tyres are 'slower'.

Which rolling resistance number corresponds to which tyre?  Have a guess.

Beware though, looks can be deceiving.  The answers are at the bottom of this blog post.


When friends, especially beginner cyclists, ask me for advice about their bikes, one of my first suggestions is to get good tyres.  It's difficult to convince them though, to convey the differences between a fast tyre versus a slow tyre.  Many road tyres look outwardly identical.  There is a temptation to judge the rolling resistance of a tyre by it's tread, it's width or it's pressure.  There's much more to it than that, though.

For example, Tyres #1 and #2 look similar. They are both slicks, and their width and pressures are identical. They must perform similarly then, right?  The MTB tyre on the top right must be slow, because it's wide soft and is knobbly, right?

These pre-conceptions mean that many people make poor tyre choices, or don't realise the consequences of their tyre choice.  It doesn't have to be that way.  With a bit of time, independent tyre test data can be found on the internet - rolling resistance data like the data used and presented in this blog post - allowing anyone to make an informed and wise decision about where to spend their money and what tyres to buy.

Two good sources on independent data are:

https://www.bicyclerollingresistance.com/

http://bikeblather.blogspot.com/


Results of the quiz are shown below.

Who would have guessed a knobbly MTB tyre at 25psi has a significantly lower rolling resistance than a slick 23mm road tyre at 80 psi?  Take care though, because this is one of the fastest MTB tyres, being compared to one of the slowest road tyres.

Nevertheless, I'm sure you'll agree, looks can be deceiving...


Saturday, 23 October 2021

Road Bike vs Gravel vs MTB speed test

Road bike versus gravel bike versus mountain bike (MTB) speed comparison
How much slower is a gravel bike than a road bike, on the road? 

How much slower is a mountain bike than a gravel bike? 

These are the questions I tried to answer with a quick test I did yesterday afternoon.  The results were a little surprising... 


The Bikes

Road Bike

A road bike from Planet X.

It has 50mm deep carbon wheels. The tyres are fast road bike tyres: Continental GP5000s with latex inner tubes.

Tyres were inflated to 80 psi.

It weighs around 7kg.


Gravel Bike

A titanium cyclocross bike from Planet X.

It's fitted with fairly fast small-knobbed gravel tyres (hence I'm calling it the "gravel bike"). The tyres are 43mm Panaracer GravelKing SK TLCs, run tubeless.

Tyres were inflated to 25 psi.

It weighs around 9kg.


Mountain Bike

A Scott hardtail.

On the front, it's fitted with a 2.25" Schwalbe Rocket Ron Snakeskin Addix Speed tyre. On the back, it has a 2.2" Continental Race King Protection tyre. Both are tubeless. These are both fast XC tyres.

Tyres were inflated to 22 psi.

It weighs around 9kg.


Clothing / Kit

For all three bikes, I wore the same road bike style kit, a tight fitting jersey and lycra shorts, base layer, standard helmet.  The same two bottles were used on all of the bikes.


Test Method

I rode the same 8 mile road circuit on all three bike, back-to-back during a 2 hour window.  It was fairly flat, with only 80m of climbing over those 8 miles.  I started with the road bike, then the gravel bike, then the MTB.

I recorded the speed on 7.5 mile stretch that was fairly uninterrupted. There was one set of traffic lights, at mile 5, where I had to stop the Garmin and re-start it. My average speeds that I extracted from Strava are not affected by the length of the stoppage at the lights.  Speed and position data was from GPS.

I tried to ensure a consistent effort on all three bike.  The road and gravel bikes both have Stages power meters. My previously power meter cross-calibration work showed that my road bike power meter over-reads by about 10W relative to my gravel bike's power meter. Hence I targeted 250W for the road bike and 240W as the target for the gravel bike.

My mountain bike doesn't have a power meter, so I had to go off feel, targeting the same rate of perceived exertion as for the other two.  I did however, have a heart rate monitor, and although I wasn't monitoring my HR during the test, my HR was close between all three bikes (Road Bike:160bpm, Gravel:157bpm, MTB:156bpm).  As a result, I was fairly satisfied that my effort and power was similar on all three bikes.

The geometry and position on the bikes is obviously different.  I chose to ride all three bikes in the style and position I would normally chose for riding each of those bikes.  Therefore, for the road bike, I was most stretched out and had the lowest torso.  I was most upright for the MTB. For the gravel bike, I was in between the other two. 


Results

As mentioned in the intro, the results were a little surprising:

   Road Bike:   20.2 mph / 32.5 kph,  245W average

   Gravel Bike: 18.5 mph / 29.8 kph, 239W average (=249W with +10W correction)

   MTB:            18.6 mph / 29.9 kph


So the Gravel bike was 8.5% slower than the road bike, which is close to what I expected.  The real surprise, though, is how fast the MTB was relative to the other two, and that it was marginally faster than the gravel bike!


Analysis

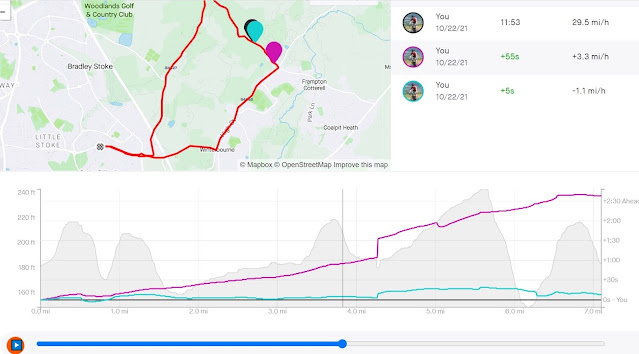
I created a segment in Strava, and used the Strava comparison feature to see how all three compared:

Gravel = Black (the reference), Road Bike = pinky purple, MTB = blue 

Road vs gravel CX vs MTB speed


Looking at this plot, it's clear that the road bike gains time on the other two everywhere.  Ignore the steps at ~4.3 miles, which is the traffic lights.  Stopping at the traffic light affects the segment times, which is based on clock time, but it doesn't affect the average speed, because I stopped my Garmin and is therefore based on time moving.

Then, the plot shows the MTB seems to gain time slightly on the uphill sections and lose time on the downhill sections.  The time losses on the faster downhill sections make sense, because the MTB and my position on the MTB is obviously less aerodynamic than the other two bikes.

It was strange, though, that it gained time on the gravel bike on the slower uphill sections. The two are similar in their weight.  Could it be the rolling resistance? Both gravel and MTB tyres were reasonably fast tyres, but the gravel bike tyres look like they should be faster.

To check this, I looked at the rolling resistance data on the Bicycle Rolling Resistance website, which is an excellent resource that I use to help me choose tyres.  I was familiar with rolling resistance data for all my sets of tyres, versus alternative choices in their categories, but I'd never compared the rolling resistance of gravel and MTB tyres against each other. To my surprise, the MTB tyres are actually lower rolling resistance that the gravel tyres:

Gravel Tyres: 56.6W @27psi,  49.4W @36psi -> 65.4W at the 25psi pressure ridden

                         -8W adjustment for tubeless setup -> 57.4W at the 25psi pressure ridden

MTB Front tyre: 48.6W @35psi, 53.4W @25psi -> 59.6W at the 22psi pressure ridden

MTB Rear tyre: 36.0W @35psi, 40.4W @25psi -> 46.1W at the 22psi pressure ridden

MTB average: 52.8W assuming 50/50 front/rear weight split (for simplicity)

                         -10W adjustment for tubeless setup -> 42.8W at the 22psi pressure ridden

All power values above are for two tyres at 85kg load at 18mph, which is quite close to my test conditions.  The GravelKing tyre data was for 38mm version, but recent testing on the BicycleRollingResistance website has shown that the performance difference between 35mm and 40mm versions of the GravelKing TLC is very similar, so using the data from the 38mm version is good enough I think.  Both rolling resistance numbers have been adjusted based for tubeless a tubeless set-up, because the standard testing uses butyl inner tubes. The MTB tyre power number was reduced by 10W, based on this BicycleRollingResistance data.  The gravel tyre power number was reduced by an estimated 8W, estimated by looking at how latex tube versus butyl tubes affected the MTB and road bike power numbers.

Something to note is that I am running foam tyre inserts in my Gravel tyres, although I took care to ensure the tyre inserts are not contacting the tyre and getting compressed at the contact patch (and with some margin to spare), to ensure the tyre inserts don't affect rolling resistance.

For reference, the road bike tyres are much lower rolling resistance than both the gravel and MTB tyres:

Road Bike tyres: 20.0W for a GP5000 with latex tubes at 80 psi, i.e. a 23-37 Watt advantage over both the MTB and gravel bike tyres.


Discussion & Conclusion

The results surprised me, but upon closer inspection it's clear that the MTB has an (unexpected) 14.6 Watt rolling resistance advantage of the gravel bike.  This seems to have an beneficial effect at the slower speeds, when the aerodynamic disadvantages of the MTB are less dominant, and overall it gave the MTB a marginally higher speed one the 7.5 mile road route.

We have to keep in mind that the MTB did not have a power meter, but nevertheless I took care not to go 'too hard' on the MTB, by riding that bike last (when I was most fatigued), and by checking my heart rate data after the ride, to ensure it was not higher than for the other two bikes. 

This leads me to now wonder: If my gravel bike isn't faster than the MTB on a flat-ish road route, in what situation would the gravel bike be better than the MTB, if any??